What are you up to now?
I took the leap and bought an Arduino from
LiquidWare. An arduino is an open-source microcontroller that has a processor, some digital I/O pins, and analog inputs. You can create little standalone programs that monitor inputs, control LEDs, and pretty much anything that you dream up. My favorite projects are ones that involve the Internet. A microcontroller is rather simple by itself, but what if it could use the web to get answers, send email, maybe update my Twitter status? That means there is a unlimited number of projects ahead - Microcontrollers collaboarating in cyberspace. The missing link for the web part is the
ioBridge IO-204. I know you are no stranger to the the IO-204, but for those of you who have not heard. The IO-204 sits on my network and relays data from its channels to ioBridge.com servers and back into my network. It allows for remote control and monitoring without network configuration and programming. One of the expansion boards is a two-way serial board that accepts serial strings and connects them to APIs of web services that ioBridge interfaces to and sends back responses. For instance, I can send the commands, "[[[calc|9*9]]]" and this returns 81. OK, maybe not impressive on the surface, but that result came from Google Calculator. Anything
Google Calculator can solve, your microcontroller has access to those results. For more examples, visit the
Serial Web Services API on the wiki.
Message Center Project
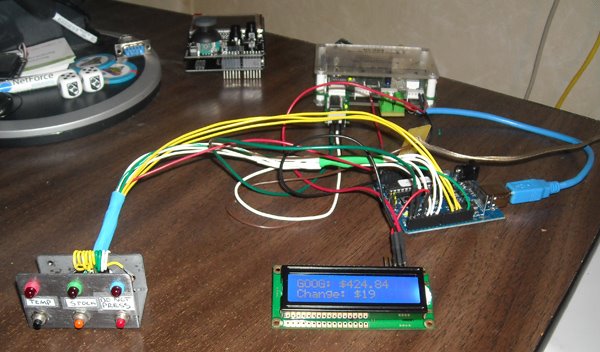
I wanted to combine these two worlds with a sample project - maybe it will inspire you to come up with something better, spark some ideas that you have. I have my arduino measuring my outside temperature here in Pittsburgh, which is an analog input scaled to Fahrenheit. At any moment I can press a button and get the temperature on the LCD screen - no Internet required. Since I have been planning a work trip to Atlanta, I also wanted to compare my temperature with hot-lanta's. So, my project solves that. Using the "weather command", I am able to get the weather anywhere in the world by zip code or city name.
I added a few more things to the message center. With another button I can get the stock quote of Google. My strike price was $405, so I have been watching it close. If it gets below $405, I get an automatic email from my message center. The stock quote comes from the Yahoo Financials API.
I have one more button that emails me a secret message when it's pressed. I put this in here for when my mom comes into my room from when I am on the road. It's aptly label, do not press. Next time, I will hook it to a light sensor in the basement to catch her when she turns on my lights. I am sure you all have the same issues with your mom.
Source Code
The arduino requires some c-like programming and I wanted to include the sketch for you to steal and use for your projects. You will see how I send the serial commands from the arduino to the IO-204 using the UART serial connection (pins 0/1) and recieve and parse the incoming results. I use a SoftwareSerial port for the LCD results. The push buttons are software debounced and use pull-up resistors for solid digital connections. The LED's linked to each button use a 330 ohm resistor to protect them. I was aided by the Arduino Inputs tutorial on
Ladyada.net,
Debounce Tutorial, and the
iobridge Wiki /
Forum. Please let me know if you have any questions, maybe I can help. I have learned a lot about handling strings on the arduino.
#include <SoftwareSerial.h>

//
// Message Center using Arduino and the iobridge IO-204
//
// An open-souce Shadowlord Project
// www.IamShadowlord.com

// SoftwareSerial Pins
#define rxPin 2
#define txPin 3

// Setup Software Serial
SoftwareSerial softSerial = SoftwareSerial(rxPin, txPin);

// Global Setup
int middleLED = 11;
int rightLED = 10;
int leftLED = 12;

int leftButton = 5;
int leftButtonCurrent = LOW;
int leftButtonReading;
int leftButtonPrevious = HIGH;
long leftButtonTime = 0;
long leftButtonDebounce = 200;

int middleButton = 4;
int middleButtonCurrent = LOW;
int middleButtonReading;
int middleButtonPrevious = HIGH;
long middleButtonTime = 0;
long middleButtonDebounce = 200;

int rightButton = 6;
int rightButtonCurrent = LOW;
int rightButtonReading;
int rightButtonPrevious = HIGH;
long rightButtonTime = 0;
long rightButtonDebounce = 200;

int tempPin = 5;
int tempAnalog = 0;
int tempF = 0;

char* currentRequest = "";

// Start up program
void setup() {

pinMode(rxPin, INPUT);
pinMode(txPin, OUTPUT);

pinMode(leftLED, OUTPUT);
pinMode(middleLED, OUTPUT);
pinMode(rightLED, OUTPUT);

pinMode(leftButton, INPUT);
pinMode(middleButton, INPUT);
pinMode(rightButton, INPUT);

softSerial.begin(9600);
delay(100);

Serial.begin(9600);
delay(100);

Serial.flush();
delay(100);

// Setup LCD
clearLCD();
setBacklightBrightness(9);
delay(1000);

// Test LEDs
digitalWrite(leftLED, HIGH);
digitalWrite(middleLED, HIGH);
digitalWrite(rightLED, HIGH);

delay(1500);

digitalWrite(leftLED, LOW);
digitalWrite(middleLED, LOW);
digitalWrite(rightLED, LOW);

}

// Start main program loop
void loop(){

// Get Analog Input and scale as temperature for ioBridge temperature sensor on arduino
tempAnalog = analogRead(tempPin);
tempF = tempAnalog / 6.875;

// Monitor left button status and debounce
leftButtonReading = digitalRead(leftButton);

if (leftButtonReading == HIGH && leftButtonPrevious == LOW && millis() - leftButtonTime > leftButtonDebounce) {
if (leftButtonCurrent == HIGH)
leftButtonCurrent = LOW;
else {
digitalWrite(leftLED, HIGH);
clearLCD();
delay(100);
softSerial.print("Outside: ");
delay(100);
softSerial.print(tempF);
delay(100);
moveCursor("02", "01");
delay(100);
softSerial.print("Atlanta: ");
leftButtonCurrent = LOW;
//Request temperature in Atlanta via ioBridge
Serial.print("[[[weather|Atlanta]]]");
digitalWrite(leftLED, LOW);
}
leftButtonTime = millis();
}

leftButtonPrevious = leftButtonReading;

// Monitor middle button status and debounce
middleButtonReading = digitalRead(middleButton);

if (middleButtonReading == HIGH && middleButtonPrevious == LOW && millis() - middleButtonTime > middleButtonDebounce) {
if (middleButtonCurrent == HIGH)
middleButtonCurrent = LOW;
else {
currentRequest = "Google";
digitalWrite(middleLED, HIGH);
clearLCD();
delay(100);
softSerial.print("GOOG: $");
delay(100);
middleButtonCurrent = LOW;
//Request Google Stock Price via ioBridge
Serial.print("[[[stock|GOOG]]]");
digitalWrite(middleLED, LOW);
}
middleButtonTime = millis();
}

middleButtonPrevious = middleButtonReading;

// Monitor right button status and debounce
rightButtonReading = digitalRead(rightButton);

if (rightButtonReading == HIGH && rightButtonPrevious == LOW && millis() - rightButtonTime > rightButtonDebounce) {
if (rightButtonCurrent == HIGH)
rightButtonCurrent = LOW;
else {
digitalWrite(rightLED, HIGH);
clearLCD();
delay(100);
softSerial.print("Alert: ");
delay(100);
rightButtonCurrent = LOW;
//Send email via ioBridge
Serial.print("[[[email|hans@nothans.com|Alert|Mom, is pressing your buttons]]]");
digitalWrite(rightLED, LOW);
}
rightButtonTime = millis();
}

rightButtonPrevious = rightButtonReading;

// Display serial messages
if(Serial.available() > 0){

delay(100);

char charIn = 0;
byte i = 0;
char stringIn[32] = "";

while(Serial.available()) {
charIn = Serial.read();
stringIn[i] = charIn;
i += 1;
}

if (currentRequest == "Google") {

 softSerial.print(stringIn);
 int stockPrice = atoi(stringIn);
 delay(100);
 moveCursor("02", "01");
 delay(100);
 stockPrice = stockPrice - 405;
 softSerial.print("Change: $");
 delay(100);
 softSerial.print(stockPrice);
 currentRequest = "";

}
else
softSerial.print(stringIn);
}

// End program loop
}


//
// ioBridge Serial LCD Functions and Parameters (for SoftwareSerial)
//

void displayMessage(char* message){
softSerial.print(message);
}

void clearLCD(){
softSerial.print(0xFE, BYTE);
softSerial.print("Z");
}

void setBacklightBrightness(int level){
// level
// 0=Off -> 9=Brightest

softSerial.print(0xFE, BYTE);
softSerial.print("B");
softSerial.print(level);
}

void setBacklightTime(int level, byte seconds){
// level
// 0=Off -> 9=Brightest

// seconds
// 01 = 1 seconds => 06 = 60 seconds

softSerial.print(0xFE, BYTE);
softSerial.print("T");
softSerial.print(level);
softSerial.print(seconds, BYTE);
}

void moveCursorHome(){
softSerial.print(0xFE, BYTE);
softSerial.print("H");
}

void turnCursorOn(){
softSerial.print(0xFE, BYTE);
softSerial.print("J");
}

void turnCursorOff(){
softSerial.print(0xFE, BYTE);
softSerial.print("K");
}

void turnBlinkingCursorOn(){
softSerial.print(0xFE, BYTE);
softSerial.print("P");
}

void turnBlinkingCursorOff(){
softSerial.print(0xFE, BYTE);
softSerial.print("Q");
}

void scrollMessage(int row, int speed, char* message){
// row
// 1=First Line -> 2=Second Line

// speed
// 0=Slowest -> 9=Fastest

softSerial.print(0xFE, BYTE);
softSerial.print("S");
softSerial.print(row);
softSerial.print(speed);
softSerial.print(message);
softSerial.print(0xFE, BYTE);
}

void moveCursor(char* row, char* column){
// row
// 01=First Line -> 02=Second Line

// column
// 01=First Position -> 16=Last Position

softSerial.print(0xFE, BYTE);
softSerial.print("L");
softSerial.print(row);
softSerial.print(column);
}

void drawHorizontalGauge(int row, char* leftLabel, char* rightLabel, char* length){
// row
// 1=First Line -> 2=Second Line

// leftLabel and rightLabel
// 2 character labels

// length
// a=Empty -> k=Full (filled in from left to right)

softSerial.print(0xFE, BYTE);
softSerial.print("G");
softSerial.print(row);
softSerial.print(leftLabel);
softSerial.print(rightLabel);
softSerial.print(length);
}

void drawVerticalGauge(int height){
// height
// 0=Bottom -> 8=Top (filled in from bottom to top)

softSerial.print(0xFE, BYTE);
softSerial.print("V");
softSerial.print(height);

}
Bonus Project
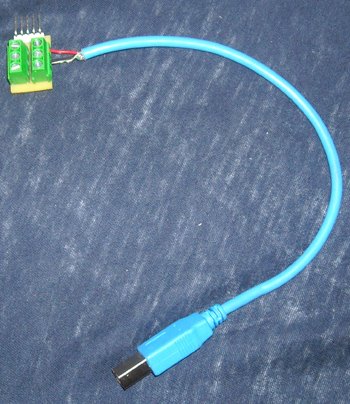
It's simple, but I hacked together a power supply for the Arduino, which gets power from USB or a coaxial input from a transformer. I wanted to only run one brick, wall wart, so I hacked a USB cable. There are 4 wires in the USB cable (from
pinouts.ru):
| 1 | VCC | Red | +5 VDC |
| 2 | D- | White | Data - |
| 3 | D+ | Green | Data + |
| 4 | GND | Black | Ground |
The IO-204 has a regulated 5VDC and ground (up to 1A - 4A total draw depending on supply) on each channel, so using a terminal strip, I connected the VCC and GND to a cut in half USB cable.

It's magic - look ma, only one power source.
Labels: api, arduino, google, iobridge, stock quote, usb, usb power cable, web 2.0